 Clima
Clima
INTRODUCTION
Clima is the widget that allows to gather all the functions of your thermostat and control them all in one place. Temperature, thermostat’s power on / off, thermostat’s modes, fan speed and season are managed in the same user interface.
USE CASES
- The user can control its thermostats around your home. Allows you to control your heating devices fron anywhere.
- The user wants to control the his living room air conditionare before coming home from work.
COMPONENT’S PROPERTIES
Customizable component’s title and icon. Please refer to “Common properties” guide.
GUI
This component’s sample is made by using Graphic UI gateway.
Please refer to “Gateways / Protocols” guide in order to get further info.
Temperature: An Info that displays the current temperature;
Setpoint: A Set point component which allows to raise and lower the temperature;
FB Set point: A Info component that works as only feedback, and will rceive the current feedback value of the configured device;
Mode: A Drop Down that let you choose the thermostat’s mode according to the device’s settings;
Mode status: Drop down component that allows to receive only the Mode status of the configured device;
Fan speed: A Drop Down that let you choose the speed of the fan according to the device’s settings;
Fan speed status: A Drop down component that will receive the Fan speed status coming from the configured device;
Vertical vane position: A Drop Down that let you choose the direction of the vertical vanes (if the device supports it);
Horizontal vane position: A Drop Down that let you choose the direction of the horizontal vanes (if the device supports it);
Season: A Drop Down that let you choose the season according to the device settings;
Timed thermostat: A Timed thermostat which allows to set automatic and manual mode;
Working status: A Color info or Text info that displays the current working status of theconfigured device;
Working speed: An info component that serve as displayer of the current configured device’s working speed;
On/Off: A Drop Down that let you choose to turn on/off the device (for remote controller with power on and power off buttons);
On/Off status: A Color info or Text info, that displays the On/Off status of the configured device;
Power On: A Scenario to turn on the device (KNX scenario or Ghost scenario containing a switch);
Power Off: A Scenario to turn off the device (KNX scenario or Ghost scenario containing a switch);
HELP
Clima configuration can be easily carried out by using component’s drag&drop function. When setting components on Component’s parameters, you can use the drop down menu, or you can drag and drop them from “My components” area to the component selection field.
Reminder before continuing:
- Download and Install EVE Logic plugin to enable plugins (link);
- After loading .eve project to the server, run EVE Remote app, log in and then wait a couple of minutes for logics activation.
 EVE Remote Plus
Three different view mode possibilities: “CLASSIC”, “MODAL” and “HIDDEN”. Learn more about the component’s view modes.
CLIMA’S IN APP INTERFACE
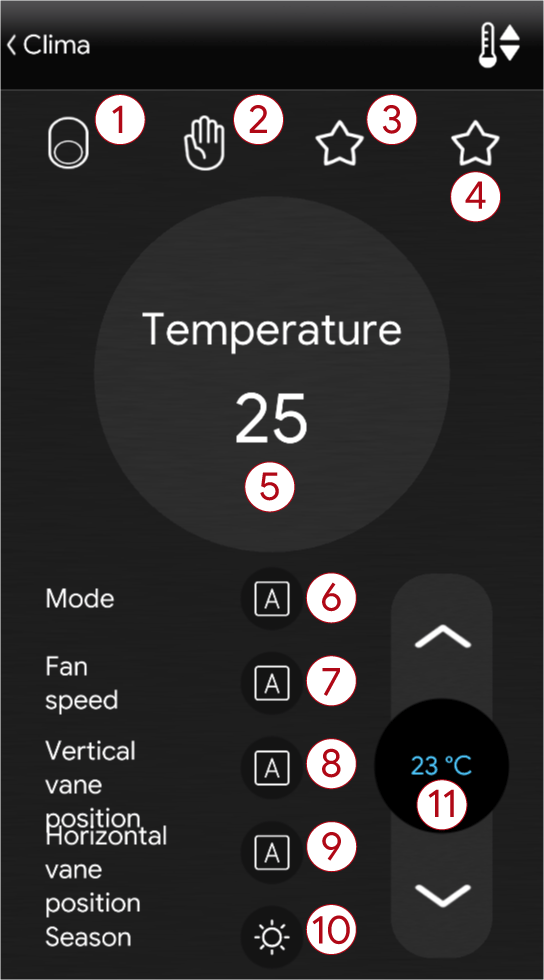
Here is below the list of the elemets that compose the Clima’s in APP interface.
Clima’s component in app interface elements
- ON / OFF: This Switch allows the user to turn ON and OFF of the linked device;
- Timed thermostat: This Timed thermostat element allows the user to switch between the two thermostat’s modes and to schedule the temperature for each hour of the day. For further indormation about the Timed thermostat component consult its guide here;
- Power ON scenario: A Scenario that can be set up in order to send a certain command for the ON action to the device you are setting up;
- Power OFF scenario: A Scenario that can be set up in order to send a certain command for the OFF action to the device you are setting up;
- Temperature: A Info display the current temperature coming from a temperature probe;
- Mode: Drop down allows the user to switch the modes of the device you are setting up;
- Fan speed: A Drop down allows the user to select the fan speed mode of the device that you are setting up;
- Vertical vane position: This Drop down allows the user to change the vertical vane position of the device your are setting up;
- Horizontal vane position: This Drop down allows the user change the Horizontal vane position of the device your are setting up;
- Season: This Drop down allows the user to change the season of the device of the device you are setting up;
- Setpoint: This Set point allows the user to set the temperature which the device will be set on;


